Sunday, December 30, 2012

Angel Tag

In my last DT kit from Wild About Scrap I was very fortunate to recieve TH Sizzix alterations die Layered Angel Wings. I am so in love with this die I had to make a quick tag.

Taking an 8in manila shipping tag I used the technique used by so many :) the one where you add the distress ink to your work mat then spritz some water to dilute the colours then wipe your tag through allowing the colours to blend. Using vintage photo distress ink and a blender I added a little colour to the edges, lastly using a TH christmas music sheet stamp I stamped the image with peeled feathers distress ink. Using my bigshot I cut out the Layered Angel Wings from white card and calico and using my distress inks coloured them and added a touch of glimmer with tattered angels dazzling diamonds glimmermist, using pop dots when assembling them for some added difinition. I finished off the tag with some vintage lace, bakers twine and a small resin rosebud at the bottom and at the top I tied some seam binding and gold tinsel ribbon and added a small chipboard snowflake which I gesso'd then used diamond stickles to add lots of sparkle. The image was downloaded and printed from the internet then cut out with scissors.


I really like playing with my distress inks and its a goal of mine to be able to blend them like so many are able to do. In 2013 I hope to be able to spend my time scrapping and I plan on starting a mixed media technique journal :) I made this awesome altered book in a class with the very talented Natalie over at Artability which I will share with you all very soon :)

I would like to take this opportunity to wish you all a very safe and Happy New Year and hope 2013 brings you much joy to your heart and warmth into your home and happiness in everything you do. xx

hugs
xx


 Photobucket

Wednesday, December 19, 2012

Wall Hanging

Getting into the Christmas festive theme I decided to make a timeless Wall Hanging which I can reuse each year :)

Firstly using everyday cardboard as the base and peeling the top layer to expose the corigated inner, I had fun grunging it up with my prima distress tool I then spread Jo Sonja's texture paste around the edges which I let dry (you could use a heat gun) then I inked with TH distress inks - Dusty Concord and Vintage Photo and added some metallic rub-ons finishing with a spritz of Marshmellow glimmermist giving it a snowlike shimmer all from my stash. I layered purple bazzill which again I used my distressing tool ( just looove this tool ) all around the edges before adding the top layer of gorgeous Graphic45 Nutcraker Sweet Collection paper. This too I distresses, inked, sanded and spritzed with the above mentioned TH distress inks and glimmermist! It's a little hard to see but it really has a beauiful shimmer to the paper :) I added a touch of vintage lace, glueing it around the edge.The flower spray consists of die cuts which I cut out using TH Festive Greenery die (love this die and don't use it nearly enough!), Prima Cartier Aquinna blossom and left over Prima spray off cuts, string of pearls and two handmade hat pins. Lastly adding some copper antique chain and a few charms and beads so I could hang it.


Thanks for popping by, I know I haven't been a good blogger of late but its one of my 2013 goals :)

Have a very Merry Christmas and a safe prosperous New Year!
 

Photobucket

Thursday, November 22, 2012

Inchie Board

What a week! I have been juggle regular hospital visits with everyday life as my poor Mum had a fall last Saturday and somehow broke her hip needing immediate surgery which has given us all quite a shock and it's hard seeing a once self reliant woman needing special care to do just simple things :(

So this is a quick post as I did promise to put up my finished Inchie Board. I have made mine with 64 tiles but you can make them to whatever size you like. My tiles are 1 1/2 inch by 1 1/2 inch for the smaller tiles then 1 1/2 by 3 inches with some 3 inch by 3 inch tiles as well (these larger ones are counted as 4 tiles). Photos have been cut 1 1/2 inch by 1 1/2 inch and all have been matted onto chipboard measuring the same size then I arranged them onto a larger 12 x 12 piece of chipboard. It is entirely up to you how many photos you use. These little tiles are just so much fun, I love how you can make each individual little tile a piece of art, a special little mini keepsake and can put as much or as little detail as you like. I plan to make a few more!


My new DT kit arrived from Wild About Scrap this week and while I have only had a quick look it is jam packed with goodness and I can't wait to get playing with all the wonderful stuff, so please call back and remember I value and enjoy reading all your lovely comments.

Have a wonderful day! xx


Photobucket


Wednesday, November 14, 2012

Inchies


Veronica over at Wild About Scrap is very generous with the DT kits she sends out, we are very fortunate as after making projects there is still plenty left over for more :)

Ever wondered what to do with all your left over little bits and pieces? Inchies yes tiny little tiles which measure 1.5in x 1.5in or 3in x1.5in even 3in x 3in then add them along with photos cut into the same dimensions altogether to form a patch. Mounting each piece onto chipboard. Then once you've made a stack you can add them to make a canvas, wall board frame or whatever. They are heaps of fun and you can be as creative as you like, the possibilities are endless! Below are just a few little tiles I've made and I will back to share with you the end results in just a few days :)


Don't forget to come back and visit to see the finished board. Have a great week! xx


Photobucket


Monday, November 5, 2012

Happy day!

I had forgotten how much fun dies can be to play with! They can be the perfect addition to a card or layout and you can easily coordinate them to any theme. Below are two cards I made using both Spellbinder dies and die cuts which easily show with some foam dots you can add lots of dimension.


Fancy Pants - Time for Spring Pour Me Out
Spellbinders Nestabilities - Labels Seven
Cuttlebug Embossing Folder - Script 
Bazzill Basics
Retro Punch
Prima Flowers
Organza Ribbon


Top view showing dimension.

Card number two is more simple and focusing on the die cut Coffee pot and Frame.


Fancy Pants - Time for Spring Time for Spring Cuts
Bazzill Basics
Lace and handmade flower


Top view showing dimension, stitching and distressing.

I still have a number of diecuts left over for either another layout or more cards so please pop back soon.

Happy scrapping!


Photobucket

Thursday, November 1, 2012

Sweet Happy Fun

Oh my! October was over before I knew it! and what a month it was.

Had such alot going on over the last month, a few hectic and trying moments the worst, my son had an accident and wrote off his car and my precious little one was with him, thank goodness no one was injured and cars are replaceable! So very stressful though for all concerned and as much as we want to protect them every minute we must also let them grow up.

Anyway a quick post I wanted to share. Using more products from the last DT kit from Wild about Scrap which included Fancy Pants Time for Spring I created this simple layout of my little one when she went on a school excursion to the Swan Valley animal farm.

 
Fancy Pants Time for Spring - Gingham Dress
Fancy Pants Time for Spring - Short and Stout
Fancy Pants Time for Spring - Time for Spring Cuts
Bakers Twine
TH Distress Ink - Vintage Photo
Prima - Mini Roses


I have made a couple of cards with leftovers and will be back to share :)

Thanks for taking the time to drop by. Have a great day and remember to spend a little time being creative!

xx


Photobucket

Tuesday, September 25, 2012

Happy Haunting

Gosh September is almost gone, and October is fast approaching and with it Halloween. Not celebrated big here in Oz but its catered for more these days than ever before. Our primary school is having a Halloween disco as it was such a success last year, kids loved it! Shops have special treats and novelties in store and many scrapping shops have stocked up on Halloween diecuts, chippies and trinkets. I love the Graphic 45 range and was lucky to receive some in my September kit from Wild about Scrap so pop on over and check them out :)

Here is a quick and easy card with a little bit of fussy cutting and 'pop' mounting. Another one for the collection I am donating to  Combat Cards (a fabulous group who make cards for the Australian troops to send to their loved ones).


Graphic45 - Happy Haunting Collection
Word Play & Happy Haunting
Bazzill
Prima Flower

Have a terrific Tuesday and I hope you pop back soon :)

xx


Photobucket

Monday, September 3, 2012

Been neglecting my blog lately and I apologise, think lost a few followers :( because of it I guess. Life has just been busy and one thing and another and whoa two months has flown by. Things have settled right down so I will be able to spend more time updating and doing the things I love - yay!

The lovely Veronica from Wild About Scrap sent another kit jam packed with so much goodness from Fancy Pants, Graphic45, October Afternoon and Tim Holtz. Stirring up lots of inspiration I wasn't sure which I wanted to play with first! With Halloween just around the corner I couldn't resist the Graphic45 Happy Haunting Collection. Using a printer tray from my stash, paint, prima vine, DA chipboard fence and the gorgeous Graphic45 chipboard tags and paper collection from the kit I had fun playing and decorating this tray :)


Graphic45 Happy Haunting Collection papers
Graphic45 Chipboard Tags - Happy Haunting 2
Tim Holtz Idea-ology Halloween Adornments


Thanks for stopping by and visiting and be sure to pop back on by as I promise to update more regularly :) and I still have so much more of the kit to play with!

Enjoy your week and I hope you get a little time to enjoy some crafty creativity xx


Photobucket

Sunday, June 24, 2012

You are my Sunshine

Hello, I am getting better trying for regular updates :) it's not been so long between posts! Another busy week just gone with helping at the school and getting my eldest dd ready for her first camp away on her own with the school - all the way across to the East Coast!! how exciting but nerve racking for this poor Mum lol

Sharing today a recent layout I completed for Wild About Scrap DT. Its a favourite photo of my beautiful dd, she hates having her photo taken to I snapped this when she wasn't looking, she is indeed 'my sunshine'


Echo Park - Hello Spring, Butterfly
Echo Park - Hello Spring, Journaling
Bazzill Basics - Typhoon
Dusty Attic - Birds on a Branch
Prima - Dollhouse Collection, Molly


I hope to share soon some fun little projects I have been madly working on!! :)

Thank you for stopping on by! Hope you are all having a fabulous weekend! It's cold here but loving the time with the family and friends.

xx


Photobucket

Tuesday, June 19, 2012

A card or two..

Weather here is wet! lol we have puddles everywhere much to Miss Five's delight! on go the wellies and she would spend hours splashing if only we let her! Shaping up to be a very cold and wet winter here, but we need it! Farmers need the rain for their crops and all of the dams are low and water restrictions are in place so maybe now with all this rain falling from the heavens these restrictions will be lifted for next summer.

So as its to cold out and great crafting weather inside by the warm fire staying dry I decided to catch up on some DT work and made not one but two cards! Cards really aren't my thing although I did enjoy making them for a change, using up some of my kit from this month and last month.


Moxxie - Nautical - Set Sail
Dusty Attic Anchors
Bazzill Card

Using Moxxie Set Sail paper I used TH alterations movers & shapers and cut out a baroque trying to keep the word 'sail' central, adhering this to the reverse of the Moxxie nautical paper and adhering both to blue Bazzill card. I then inked the DA anchor with distress ink and applied Tattered Angels Glimmer Glam and UTEE'd for texture. I wound some rope-like twine around the top of the anchor then added a charm and mini tag. Finishing off with some bakers twine, button and a "Happy Birthday' banner.


Moxxie - Natuical - Set Sail, reverse
Echo Park - This & That 6x6 
Bazzill Card

Sometimes papers clash or are just that little bit too bright as was EP This & That Graceful so I applied a medium to dull it a little. Easily achieved by whitewashing in this case with Jenni Bowlin Malted Milk dabber paint. I then stamped with TH Bird on a branch with distress ink - Black Soot and matted on black bazzill. I  love to use machine stitching so added it along the edge. Mounting the image onto Moxxie Nautical reverse and adding some RagWeave material strip from my stash and making a flower from EP This & That using TH Tattered Flower Garland die spritzed with Tattered Angels Mist - Lemongrass.

Thanks for stopping by and I will be back again soon with more to share :)

Have a happy scrappy day!

hugs
xx

Photobucket

Tuesday, June 12, 2012

Mini Album

I do apologise for being AWOL. Oh my goodness I just realised it's been quite some time since I posted, almost a month ago I am so sorry. Its been a bit of a roller coaster here! Some very sad and emotional times but with a few highs thrown in and just never enough hours in the day. I have been very busy volunteering at the girls school running their canteen and doing other P&C related things not forgetting back doing 4x4 club stuff and then weekend just past we had an awful storm front lash Perth where we made World news and they are forecasting another wild afternoon and night advising everyone to stay indoors, Perth doesn't normally gets this severe weather. Mother Nature sure is not happy :( we have trees down, girls cubby is battered and damaged and we lost power for quite a number of hours, almost 10 hours I think it was, but otherwise not to badly damaged, I feel so sad for those still with out power and it could be days before they have it returning to normal. So lets keep them in our prayers and thoughts and hope there isn't too much more damage.

Well during these last few weeks I have been scrapping, just a little here and there and have a beautiful mini album I made to share with you. Originally wanted it finished back in May as it was hubby & my 28th Wedding Anniversary :) but just could not find the right photos to go with it and needed to add a few finishing touches, I am really pleased with how its turned out.

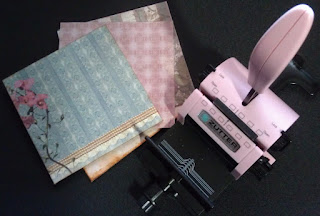
It was also part of my May DT kit for WIld About Scrap, packed with lots of great products including Zutter 6x6 and Perfect closure and Tattered Angels mist.

I used lots of Donna Salazar papers from my stash, I love these papers and they look great just left as is or ink them up and make them grungy, just so easy to work with. Lots and lots of Timmy products, glimmer Mists and Prima flowers and anything left laying on my work area managed to get used lol!


Using Zutter 6x6 Craft Cover, Zutter Owires 3/4" and Zutter Perfect Closures Heart from my May DT kit from Wild About Scrap


I took Donna Salazar Botanique paper from my stash  and then I covered the craft cover and cut the rest of the papers to 6x6 and using the Owires and my Zutter binded it all into a nice little mini album  


Pages 1 & 2
lots of Prima flowers from my stash, key hole from TH Alterations hardware findings die, TH ticket adage, Adorn it alpha stickers, MS border punch, TH rosette die, leaves, twine, pearls, charms & brads


Pages 3& 4
Flower blossoms, charm, ribbon, retro punch
tag comes out to reveal a quote, flower and tag have both been sprayed with Glimmer Mist


 Pages 5 & 6
Prima flowers,Prima Say it in Pearls, Memory Box rounded fence die, muslin, Kaiser pearl strip, Adorn it alpha stickers, Kaiser mini alphas
tag will have journalling on and the piece with the butterfly pearls opens to reveal a photo 


 Pages 7 & 8
Prima bloosoms, TH birdcage die, lace, Pearls, Prima Say it in Pearls, leaves, Prima flower altered with Tattered Angels Glimmer Mist, Collections butterfly, Prima Vine.


Thanks for stopping by.. until next time Happy Creating!


Photobucket

Thursday, May 17, 2012

Summer..

I have been playing around with Mixed Media and thought I would share a recent layout with you all! It's using some of the left over bazzill and flowers from my DT kit from Wild About Scrap.


Creating my background first, I used white bazzill and spritzed with Smooch Spritz Spray and Perfect Pearls Mists. Covered the entire paper with Mod Podge and then crinkling up some recycled tissue paper place on paper trying to get as many deliberate creases and folds as possible. I then chose three sections and using white gesso covered enough so that I could stamp using acrylic paint with bubble wrap – gives a cool effect! I also used a Prima mask with Glimmer Mist and  TH distress ink. I then used my sewing machine and stitched with both zig-zag and straight stitch for a little interest.
Then the fun part, I gathered anything and everything that went with the photo - Prima flowers, lace, beaded trim, pearl swirls, twine, MS punched butterfly and embellish. Can be as messy and grungy as you like.
My next DT kit from Wild About Scrap arrived earlier in the week and I am eager to get stuck in and have a play now that things are settling down, lots and lots of yummy things (thanks heaps V) you really know how to get the creative juices flowing :)

Please head on over to Wild About Scrap DT Blog, leave some love and if your not already a follower please do so, you will then see what the other wonderful DT girls and I create :)
Thanks for stopping by, until next time Happy Creating!
Sue xx


Photobucket

Sunday, May 13, 2012

Butterflies...

After a very busy week I am still going! See I told you May was our extremely busy month, I do love all the activity but thankfully its half over! My beautiful precious baby is turning 5 tomorrow and we have been baking cupcakes for her classmates this morning (just need to ice them shortly) and instead of giving out lolly bags we went with something a little different. We used the cricut and cut out pretty Butterflies from the Indi Art cartridge and bling'ed them up with kindy glitz and stickles :) then placed a candy roll as the body! My baby is so very pleased and proud of herself as she did most of the work herself with just a little help from her big sister and myself! She is growing up way to fast!


aren't they just the cutest!


Just like to wish all those who are Mum, Mother, Grandmother, Nanna, Godmother and more a very Happy Mother's Day xx


Thanks for popping by, have a very lovely day!

Photobucket

Thursday, May 10, 2012

Sock Cupcakes

What with organising a Mother's Day stall at the primary school, special meal deals for next week and having to fill in and run the canteen I haven't had anytime for scrapbooking, well not the usual scrapping. We needed some quick little gifts for the stall and I came across these really cute 'cupcakes' So I have been madly making them, kids LOVE them!


take a pair of fluffy bed socks, start rolling from the toe with the heel to the top and the unevenness looks like frosting, so cute. Stick in a cupcake (I grabbed a template off the internet and hand-cut) add a lollipop for the cherry and wrap in cellophane and add some curling ribbons and your done!

nice and quick little gift!

Have a great day! hope to see you pop in again soon. xx
Photobucket

Saturday, May 5, 2012

Vellum Flower Tutorial

Today is National Scrapbooking Day, great day here to scrap as its raining outside! Might even find some time to do a little blog hopping too, love seeing what everyone else has been up to but first I thought I might share a very quick Vellum flower tutorial. I am not the first to do this kind of tutorial but I just want to share my take on how quick and easy it is to make a flower embellishment either out of Vellum or paper to suit your scrapping project be it a card, layout of OTP :)

What you will need:

EK Success Large Retro punch
EK Success Medium Retro punch
Papercraft scissors 'Cupid's Bow' Jumbo size
Ink (any colour)
Glue
skewer or pencil


punch out three of each size Retro flower
(you can use any 5 or 6 petal flower)


using your scissors cut your larger petals (optional) this gives a more floral appearance to your flowers!


Ink all the edges of both small and larger petals, then bend all larger flower petals upwards and towards the middle to help form a flower, taking your skewer (or tip of a paintbrush) roll the petal tips then layer these together. Cupping them alternately staggered.


With the three smaller punched flowers fold one the same as the larger ones and roll tip of petals, the remaining two flowers fold petals lengthwise, this will help when you pinch to form the centre. Adding a tiny amount of glue fold and pinch smaller flower into a bud, layering the two together. Lastly add the third punched flower. Now join all together and you have a pretty Vellum flower!


Add some Stickles or Kindyglitz for a nice finishing touch.

Hope you find this tutorial helpful and I look forward to seeing your wonderful creations!


Happy National Scrapbooking Day!


Photobucket